Oracle HCM Data Loader (HDL) Process ❓ 🤔
- Oracle HCM Data Loader (HDL) jobs, a powerful tool for bulk loading data through integrations.
- Using Oracle HDL, you can load business objects for most Oracle HCM Cloud products into Oracle Integration. For example, you can load new hires from Oracle Talent Acquisition Cloud (Taleo EE) as workers into Oracle HCM Cloud using an Oracle HDL job.
- Integration architect can generate the delimited data files in Oracle Integration using business object template files provided by Oracle HCM Cloud. The business object template file must be associated with a stage file action in Oracle Integration to generate the delimited data file .
– Advertisement –
- To learn more about how to obtain the business-object template file from Oracle HCM Cloud and use the same for delimited data file generation, refer to this post on the Oracle Cloud Customer Connect portal.
- ⭐At a high level, an Oracle HDL job pattern can be implemented in three steps:
1) Generate the HCM HDL compliant delimited data (.dat) file.
2) Submit the Oracle HDL job.
3) Monitor the job status until completion.
Hands-on Practice :
PART – 1
METADATA|PersonEmail|DateFrom|DateTo|PersonNumber|EmailType|EmailAddress|PrimaryFlag MERGE|PersonEmail|1951/01/01|2022/06/22|69658|H1|test@gmail.com|Y MERGE|PersonEmail|1951/01/01|2022/06/22|65507|H1|test@gmail.com|Y
All files must include METADATA lines, to explain which attributes are included in the file and the order in which their values are supplied.
All attribute names and values are delimited by the pipe ‘|’ character by default.
The string immediately after the METADATA instruction identifies the record type the attributes are for, in our case ‘PersonEmail’. The values that follow are the names of the attributes available on the PersonEmail record, that you want to supply data for.
- Login to HCM Cloud Application, on the home page ⌂, click My Client Groups > Data Exchange
- On the Data Exchange page, click Import and Load Data
- Click Import File (at top right)
- Click Choose File button and select the .zip file which we have saved above and then click Review Parameters. You can directly click on Submit Now button but I intentionally want you check the parameters also because these parameters name and its value we will Map while developing OIC Integration.
- You don’t need to change the parameters values. Just click Submit
- Click OK on the Submitted confirmation page
- Import and Load Data process will get starts. Click Refresh 🔄 until the Import and Load status completed. Once the Import and Load process completed successfully, you can verify the HDL process by checking the Employees records.
- Go the HCM Application Home Page, click My Client Groups > Person Management
- Search with any of the employee number which you have uploaded above in .zip file.
- Then click Task Icon 🗉 and then select Person
- You can see the Home email got updated with the ones which we have passed above in .zip file. This way we have successfully Load file with HCM Data Loader. Now we will develop the Integration that will be capable to do the same process which we have did manually.
PART – 2
METADATA|PersonEmail|DateFrom|DateTo|PersonNumber|EmailType|EmailAddress|PrimaryFlag MERGE|PersonEmail|1951/01/01|2022/06/22|69658|H1|oic_test@gmail.com|Y MERGE|PersonEmail|1951/01/01|2022/06/22|65507|H1|oic_test@gmail.com|Y
- Create a Schedule Integration having some meaningful name.
- Search for the FTP connection and select it. FTP adapter configuration wizard will get opened.
- Enter any meaningful name for the endpoint and then click Next
- Select ‘Download File‘ operation , *Transfer Mode as Binary and enter the Download Directory path and then click Next
- FTP Adapter configuration completed. Click Done.
- Now search for the HCM Connection and select it. HCM adapter configuration window will get opened.
- Enter any meaningful name for the endpoint and then click Next
- Select Import Bulk Data using HCM Data Loader (HDL) and then click next
- Select *Security Group = FAFusionImportExport and *Doc Account =hcm$/dataloader$/import$ and then click Next
- HCM Adapter configuration for HDL completed. Click Done.
- Now lets complete the Mapping :
- Open the FTP Adapter mapping
- Map the file Name , Directory and DownloadDirectory directory. Please make sure that for this Article please pass below details :
- File Name = Worker.zip (in current case we are uploading Person Email of Worker business object so we need to pass Worker.dat file name exactly)
- Directory = enter the FTP directory path where the Worker.dat file will be present while testing
- DownloadDirectory = you can enter ‘/’
Please take reference from below image
- Add Assign action, enter some meaningful name and click create.
- click on ➕ icon and declare one variable name ‘varHDLFlowStatus’ and initialize its value as ” (empty string) by clicking on edit icon 🖉. Then click Validate and Close the assign window.
- Now we will add While action in the flow which will keep executing in a loop till the time submitted HDL process is completed :
- Search for the While action and select it. Enter a meaningful name (ex- HDLFlowLoop) and then click create.
- Click on ‘Expression Builder’ and build the expression like below and then click Validate and close the expression window.
- Now lets configure HCM adapter to invoke operation which will query the status of the submitted HCM Data Loader Job :
- Search for the HCM Connection and select it. Enter any meaningful name for the endpoint, click Next
- Open the mapper by clicking on 🖉 icon and map the Process Id. Click Validate and click Close ( please take reference from below image )
- Now we will add one more assign action in which we will update the variable value which we have declare before While action (in above step )
- Search for Assign Action and select it. Enter any meaning name (like ‘updateHDLFlowStatus’ ) and click Create.
- Click on the ➕ icon, select the variable which we have declare before while loop from the drop down menu (in my case is ‘varHDLFlowStatus) and then click on edit 🖉icon
- Drag and drop the *STATUS element in the expression builder ( take reference from below image ). Then click Validate and Close.
- Again click Validate and Close.
- Now at the end of the development just add one WAIT Activity of 10 sec. So that the while loop execute after interval of 10 secs. Once the while condition is fulfil it will exit the While Loop.
- search for Wait action.
- Enter some meaningful name for the WAIT Action. In seconds column enter 10. Click Create.
- Integration development is completed. Enable the Tracking by clicking on the hamburger sign ( top right )
- Upload the Worker.zip File ( which we have saved in PART 2 : STEP 1) in the FTP Folder ( make sure you upload the file in same directory path which you have entered in the FTP Mapping in PART 2 : STEP 2)
- Wait for the Integration Run to get completed. You can check the status in Monitoring Page ( You can Navigate to Monitoring window by clicking on Home Icon (top left ), then click Monitoring –> Integrations –> Tracking
- Once the Integration run completed, you can login to HCM Cloud Application and can verify the PersonEmail of the Employees get updated successfully with the email details which we havwe pass in the Worker.zip file by following the same verification steps that we followed in PART 1 of this article.
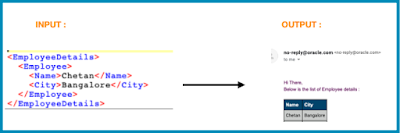
Knowledge : 👀 Notification? : Enables you to send notification email to relevant users at specific points in the execution of an integration. When we can use dynamic email notification ❓🤔 suppose you want to send email notification that contain DATA in TABEL FORMAT which ROWS is not FIXED i.e. body of email notification is not fixed.


