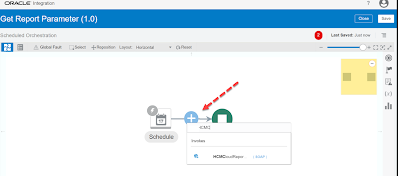
Blog

  • Opaque Schema in OIC

    Opaque Schema in OIC


    Schema  In OIC Schema File (i.e. XML Schema) is used to define the structure of the file which is being used to store data.

    Below is an example of an XML schema, or XML schema definition (XSD).

    – Advertisement –


    <xs:schema attributeFormDefault="unqualified" elementFormDefault="qualified" targetNamespace="http://xmlns.oracle.com/employeedetails" xmlns:xs="http://www.w3.org/2001/XMLSchema">
    <xs:element name="EmployeeRequest">
    <xs:complexType>
    <xs:sequence>
    <xs:element name="Employee" maxOccurs="unbounded">
    <xs:complexType>
    <xs:sequence>
    <xs:element name="Emp_Id" type="xs:integer" minOccurs="0" />
    <xs:element name="Emp_FirstName" type="xs:string" minOccurs="0" />
    <xs:element name="Emp_LastName" type="xs:string" minOccurs="0" />
    <xs:element name="Emp_Designation" type="xs:string" minOccurs="0" />
    <xs:element name="Emp_DC_Location" type="xs:string" minOccurs="0" />
    </xs:sequence>
    </xs:complexType>
    </xs:element>
    </xs:sequence>
    </xs:complexType>
    </xs:element>
    </xs:schema>

    Opaque Schema Now suppose you are not sure about the structure of the File or you simply don’t want to define the structure of the file then you can  use the Opaque Schema. 

    You can use an opaque schema in a stage file action Read File or Write File operation without concern for a schema for the file. The only condition is that whatever is sent to the opaque element in the opaque schema must be base64-encoded data.

    Save the below xml as opaqueschema.xsd file and then you can use it in the integration.

    <?xml version = '1.0' encoding = 'UTF-8'?>  
    <schema targetNamespace="http://xmlns.oracle.com/pcbpel/adapter/opaque/"
            xmlns="http://www.w3.org/2001/XMLSchema" >
      <element name="opaqueElement" type="base64Binary" />
    </schema>


    For Your Reference 👇


  • Schedule Parameters in OIC | Oracle Integration Cloud

    Schedule Parameters in OIC | Oracle Integration Cloud


    Schedule parameters :  

    are available across all scheduled runs of an integration and can be used to facilitate processing of data from one run to the next.


    For example, when performing batch processing a schedule parameter can be used to track the current position of batched data between runs.


    Schedule Parameters : 🌟Maximum 5 variables can be added.


    – Advertisement –


    Lets see how to declare a Schedule Parameters in OIC Scheduled Integration :

    Step 1 : Create one Schedule Integration using below navigation :

    • Login to OIC Instance 🠊 Expand left hand side navigation menu 🠊Click Integration 🠊 again click Integration. Click Create. Select Scheduled Orchestration. Enter a meaningful name for the Integration and then click Create.

    Step 2 : Now lets declare one Schedule Parameters for this integration  :

    • Hover over the scheduler and then Click Edit 🖉.

    – Advertisement –


    • Click ‘➕’ and then enter a meaningful Parameter Name and then inside Value section enter default value for this Schedule Parameter. For this POC, I have declare Schedule Parameter to store timestamp value so I have enter  timestamp value as default value.
    • Now this Parameter Value can be updated at anyplace in the downstream of the Integration flow. Last stored value of this parameter will be the current value of this parameter when the Integration will get submitted the next time (i.e. next run )
    If you want to see the practical use of a Schedule Parameters in an Integration, You can check this Article (Step – 6)
    I hope you like this article. Thank You  ! 

    🙏

  • Check elements detail in HCM Cloud Application | HCM Cloud

    Check elements detail in HCM Cloud Application | HCM Cloud

    In this article we will see the steps to find the configured Elements and its detail (like element input type etc. ) in any HCM Cloud Application Instance.

    What are Elements in HCM Cloud Application❓

    Elements are components that store data, identify formulas and hold rules for processing values. The payroll process uses elements to calculate pay. You can also use elements to record absences and to capture benefit details. Some elements are predefined. You can also create other elements to match your requirements.

    – Advertisement –


    Lets see the steps to get the elements detail in HCM Cloud Application :


    • Login to HCM Cloud Application, Navigate to Setup and Maintenance
    • Click Task icon and then click Search
    • Search for ‘elements’ and then select Elements

    – Advertisement –


    • Now you can search for the element by simply entering the Element Name and Legislative Data Group. Once the search completed you can see the element in the search results, click on the respective element name to get the complete details of that element.
    • Please Note : If you do not find the element name in the search results, it means that particular element which you are searching is yet not configured in the HCM Cloud Application Instance. You need to connect to HCM Functional team to get that element configured.

    TADA ! 👋

  • Migrate Payroll Flows Pattern between Environments | Oracle HCM Cloud

    Migrate Payroll Flows Pattern between Environments | Oracle HCM Cloud


    In this article I have mentioned the steps to Import and Export the Payroll Flow Patterns from one HCM Cloud Application Instance to another HCM Cloud Application Instance.
    I have motioned the steps for both Individual Flow Migration as well as Multiple Flow Migration.

    – Advertisement –


    Individual Flow Migration 

    If you just want to migrate single flow, you can follow the below steps :

    Export Payroll Flow Steps :
    • Sign In to the source HCM Cloud Application environment and navigate to Setup and Maintenance

    • Search for Payroll Flows in the search tasks box , select Payroll Flow Patterns row then click Actions icon 🠖 Select Export to CSV File 🠖click Create New

    Note : Action Icon need to be enabled if it is not showing. Click on View🠖 click Columns🠖 Select Actions.


    • Click Add

    – Advertisement –


    • Search the Flow Pattern which you want to export and then select LDG (if require in your case ) and then click search. Select the Flow Pattern in the search results , click Apply and click Save and Close

    • Click ok and then click Submit.

    • Confirmation message will be displayed. Click ok 

    – Advertisement –


    • Now to check the Export Status , again click on Actions 🠖click Export to csv File and then click Exporting setup data


    • Once the process completed successfully , click Download File. This way we have successfully exported the flow. Now you will see the steps to import this file in different environment.

    Import Payroll Flow Steps: Now lets login to target environment where you want to import the above exported flow 


    • Login to target HCM Cloud application Instance and navigate to Setup and Maintenance

    • Search for Payroll Flows Patterns, click actions ,select Import form csv File and then click Create New

    • Choose the file which we have exported

    – Advertisement –


    • Click Submit and click ok for confirmation

    • To check the Import status, again click on Payroll Flow Patterns actions, click Import from CSV File, click Importing setup data.

    • Wait till the status is completed successfully.

    – Advertisement –


    This way we have successfully Migrated Payroll Flow from one HCM Cloud Application Instance to another Instance.


    Multiple Flows Migration 


    Part 1 :   Contain the steps to Export the Payroll Flows from Source Environment.
    Part 2 :  Contain the steps to Import the Payroll Flows to the Target Environment

    – Advertisement –


    PART 1 : EXPORT PAYROLL FLOWS :


    Export process contain two things , first we have to Create Implementation Project and then using this implementation project we have to Create Configuration Package ‘. Lets see the steps in detail :


     🖸 Create Implementation Project 

    • Sign In to the source environment and navigate to setup and Maintenance

    • Click on Manage Implementation Projects.

    • Click on ➕  to create a new Implementation
      Project
      .

    • Enter any meaningful Project Name inside section *Name. Click save and open project.

    • Click on ➕ to add Task to the implementation project.

    – Advertisement –


    • Select ‘ Tasks ‘ in the search drop down menu list and in Name box enter ‘Payroll Flow Patterns’ and then click search button. Select the search result (Payroll Flow Patternsand then click Apply and then click Done.

    • Task successfully got added in the implementation project. Click on Done button ( at top right ). The implementation project creation is completed.


     🖸 Create Configuration Package 


    Now lets Create and Export the Configuration Package from the Source Environment :  
    • Sign In to the target environment and navigate to setup and Maintenance

    • Click on ‘Manage configuration Packages’.

    – Advertisement –


    • Click on ➕  to create a new configuration Package

    • Select
      the Implementation Project which we have created above and then click Next.

    • Now we need to select the object for export. Select the Payroll Flow Definition from the list and then click on ➕ icon 

    – Advertisement –


    • Now search for the Payroll Flow Pattern which you want to migrate and once the search completed, select the flow and click on apply. Similarly add all the other flow which you want to migrate. Once all the flows are added , click Save and Close.
    • Click on Submit button ( top right ). Click Yes.

    • Export process will get started. Click on refresh 🔄 until the status is ‘Completed Successfully’.

    – Advertisement –


    • Click on the download icon 🢃 and select ‘Download
      Configuration Package
      ’.
    One Note : It may complete with warning but still you can download it. Actually in one case I face the same issue but when I import it to target environment  it worked without any issue. So you can go ahead even if some warning is coming.

    • Configuration Package ( as a zip file ) will get downloaded. Export is completed and the configuration package is ready for migration.

    – Advertisement –


    PART 2 : IMPORT PAYROLL FLOWS :

    Now Lets Import the configuration Package (which we have exported above, the zip file) from our local machine to the Target Environment.

    • Navigate to the Setup and Maintenance area under the Others tab on the Home Page.

    • From the tasks list, select Manage Configuration Packages and click Upload.


    • Click Browse to search and select the Zip file previously exported onto your local computer.

    – Advertisement –


    • Click Get Details and then Submit.

    • Click ok and then click Import Setup Data at the bottom of the page

    • Just click Next, Next & then click Submit

    – Advertisement –


    • Wait till the import process completes successfully. Click on Refresh🔄 until the status changes to
      ‘Completed Successfully’.


    This way we have Successfully Exported and Imported Payroll Flows from one environment to another. You can then use the Payroll Flow Patterns task and can search for the imported flow pattern. ✌
  • Schedule BI Publisher Report through OIC | Oracle Integration Cloud

    Schedule BI Publisher Report through OIC | Oracle Integration Cloud

    In this article I have mentioned the steps to develop an Integration that can invoke “Schedule Report” operation and can check the status of submitted schedule report operation i.e. Job Status.

    When to use Schedule Report & when to use run report operation ❓🤔   

    • In laymen term , use ‘Run Report’ operation if report output size  is <10 MB and use ‘Schedule Report’ if report content size is >10 MB. Run Report operation can provide the report output in the webservice response but Schedule Report will generate the report output in FTP , UCM etc. ( know as report bursting )

    Lets develop the  integration in two parts :

    In Part 1 : we will see the development steps to invoke ‘Schedule Report’ operation and in Part 2 : we will see the development steps to check the Status of ‘Schedule Report’ operation.


    Prerequisite : Schedule Service SOAP WSDL’ Connection. Please access this link and create the connection. We will use the same connection while developing the integration below.

    – Advertisement –


    PART – 1 : Invoke Schedule Report Operation


    Step 1 : Login to OIC Instance, click on Navigation Menu (top left) then click Integrations and then again click Integrations. Click on Create (top right) and select Scheduled Orchestration. Enter any meaningful name to the Integration.

    Step 2 : Search for the Schedule Service Connection which we have created above in prerequisite section ( if you have not created it yet, you can access this link to create this connection ) and select it. Adapter endpoint configuration wizard will get opened :

    • Enter any meaningful name (ex – ScheduleBIReport ) for the endpoint and click Next

    – Advertisement –


    • Select ScheduleReport operation from drop down list and then click Next

    • Header configuration not require for this POC , so leave it as it is , just click Next


    Knowledge :  😇
    Headers are optional elements that pass extra information about your application requirements. For Example, the header element can be used to specify digital signature for password protected services.


    • Adapter configuration completed. You can see the connection summary. Now click Done to close the configuration window.

    – Advertisement –


    Step 3 : Now open the mapper. Here we will pass the parameters name and its values that will be require to Schedule the Report.

    • Below Columns Mappings are require to invoke Schedule BI Report operation

    • Once the mapping completed, Click Validate and Close the mapping window.

    – Advertisement –


    PART – 2 : Schedule Report Job Status Check 


    Step 4 :  Add Assign action to declare some variables.

    • Click ‘+’ to declare Variable to store count (i.e. while loop count ). Enter any meaningful name to the variable then click Edit 🖉 and hardcode value ‘1’ for the variable
    • Similar declare one more variable and initialize its value to ” (i.e. empty string) . You can take reference from below image. In this variable we will save ‘GetSchedeuledReportStatus’ operation response.

    – Advertisement –


    Step 5 : Add While Action. Enter any meaningful name.


    • Click ‘Expression Mode’ and write the below expression. The while loop will keep running till the time below expression is true. ( Take reference from below image )

    not(contains($GetScheduleReportStatus,"Success"))  and not( contains($GetScheduleReportStatus, "Error"))  and not( contains($GetScheduleReportStatus, "Failed")) and  xsd:integer($CounterVariable) <  xsd:integer('30')

    – Advertisement –


    Step 6 : In this step we will invoke ‘getScheduledReportStatus’ operation to get the status of the ‘Schedule Report’ operation (which we configured in PART 1, above). 

    • Again search for the Schedule Report Service connection which we have created above in prerequisite section ( if you have not created it yet, you can access this link to create this connection ) and Select it.


    • Adapter configuration window will get opened, enter any meaningful name and click Next
    • Select ‘getScheduledReportStatus’ and click Next
    • Header configuration is not require for this POC, just click Next.
    • Adapter configuration completed. Click Done.

    – Advertisement –


    Step 7 : Open the mapper and map the ‘ScheduleReportResponse‘ to ‘ScheduledJobId‘ along with SaaS application credentials. ( take reference from below image )


    Step 8 : Now add one more assign activity in which we will Increase the counter variable value and assign the ‘GetScheduledReportStatus’ operation response to the variable.

    • Select the counter variable from drop down list, click Edit🖉 and increase the variable value by ‘1’.  Note : Make sure to use Integer functionTake reference from below image .

    • Similarly select the another variable, click Edit🖉  and the map the *jobStatus element of ‘GetScheduledReportStatus’ Response.

    • Click Validate and then click Close


    – Advertisement –


    Step 9 : Add Wait activity for 30 seconds inside While Loop. So that status check call happen after certain interval of time only otherwise While loop keep invoking status check  operation continuously, which is not a correct practice.


    Step 10 :  Enable Tracking for the Integration.

    Step 11 : Save and close the Integration window. Activate the integration. Your have successfully develop an Integration to Schedule BI Report and can check its status.


    Thank you ! 😊 , TADA !! 👋. 
  • Schedule BI Publisher Report through OIC | Oracle Integration Cloud

    Schedule BI Publisher Report through OIC | Oracle Integration Cloud

    In this article I have mentioned the steps to develop an Integration that can invoke “Schedule Report” operation and can check the status of submitted schedule report operation i.e. Job Status.

    When to use Schedule Report & when to use run report operation ❓🤔   

    • In laymen term , use ‘Run Report’ operation if report output size  is <10 MB and use ‘Schedule Report’ if report content size is >10 MB. Run Report operation can provide the report output in the webservice response but Schedule Report will generate the report output in FTP , UCM etc. ( know as report bursting )

    Lets develop the  integration in two parts :

    In Part 1 : we will see the development steps to invoke ‘Schedule Report’ operation and in Part 2 : we will see the development steps to check the Status of ‘Schedule Report’ operation.


    Prerequisite : Schedule Service SOAP WSDL’ Connection. Please access this link and create the connection. We will use the same connection while developing the integration below.

    – Advertisement –


    PART – 1 : Invoke Schedule Report Operation


    Step 1 : Login to OIC Instance, click on Navigation Menu (top left) then click Integrations and then again click Integrations. Click on Create (top right) and select Scheduled Orchestration. Enter any meaningful name to the Integration.

    Step 2 : Search for the Schedule Service Connection which we have created above in prerequisite section ( if you have not created it yet, you can access this link to create this connection ) and select it. Adapter endpoint configuration wizard will get opened :

    • Enter any meaningful name (ex – ScheduleBIReport ) for the endpoint and click Next

    – Advertisement –


    • Select ScheduleReport operation from drop down list and then click Next

    • Header configuration not require for this POC , so leave it as it is , just click Next


    Knowledge :  😇
    Headers are optional elements that pass extra information about your application requirements. For Example, the header element can be used to specify digital signature for password protected services.


    • Adapter configuration completed. You can see the connection summary. Now click Done to close the configuration window.

    – Advertisement –


    Step 3 : Now open the mapper. Here we will pass the parameters name and its values that will be require to Schedule the Report.

    • Below Columns Mappings are require to invoke Schedule BI Report operation

    • Once the mapping completed, Click Validate and Close the mapping window.

    – Advertisement –


    PART – 2 : Schedule Report Job Status Check 


    Step 4 :  Add Assign action to declare some variables.

    • Click ‘+’ to declare Variable to store count (i.e. while loop count ). Enter any meaningful name to the variable then click Edit 🖉 and hardcode value ‘1’ for the variable
    • Similar declare one more variable and initialize its value to ” (i.e. empty string) . You can take reference from below image. In this variable we will save ‘GetSchedeuledReportStatus’ operation response.

    – Advertisement –


    Step 5 : Add While Action. Enter any meaningful name.


    • Click ‘Expression Mode’ and write the below expression. The while loop will keep running till the time below expression is true. ( Take reference from below image )

    not(contains($GetScheduleReportStatus,"Success"))  and not( contains($GetScheduleReportStatus, "Error"))  and not( contains($GetScheduleReportStatus, "Failed")) and  xsd:integer($CounterVariable) <  xsd:integer('30')

    – Advertisement –


    Step 6 : In this step we will invoke ‘getScheduledReportStatus’ operation to get the status of the ‘Schedule Report’ operation (which we configured in PART 1, above). 

    • Again search for the Schedule Report Service connection which we have created above in prerequisite section ( if you have not created it yet, you can access this link to create this connection ) and Select it.


    • Adapter configuration window will get opened, enter any meaningful name and click Next
    • Select ‘getScheduledReportStatus’ and click Next
    • Header configuration is not require for this POC, just click Next.
    • Adapter configuration completed. Click Done.

    – Advertisement –


    Step 7 : Open the mapper and map the ‘ScheduleReportResponse‘ to ‘ScheduledJobId‘ along with SaaS application credentials. ( take reference from below image )


    Step 8 : Now add one more assign activity in which we will Increase the counter variable value and assign the ‘GetScheduledReportStatus’ operation response to the variable.

    • Select the counter variable from drop down list, click Edit🖉 and increase the variable value by ‘1’.  Note : Make sure to use Integer functionTake reference from below image .

    • Similarly select the another variable, click Edit🖉  and the map the *jobStatus element of ‘GetScheduledReportStatus’ Response.

    • Click Validate and then click Close


    – Advertisement –


    Step 9 : Add Wait activity for 30 seconds inside While Loop. So that status check call happen after certain interval of time only otherwise While loop keep invoking status check  operation continuously, which is not a correct practice.


    Step 10 :  Enable Tracking for the Integration.

    Step 11 : Save and close the Integration window. Activate the integration. Your have successfully develop an Integration to Schedule BI Report and can check its status.


    Thank you ! 😊 , TADA !! 👋.